This is an old revision of the document!
<html>
<h2>Proxy Tutorial </h2> <p>Your Xirvik seedbox comes equipped with its own proxy.<br>
This is good because it anonymizes your connection, preventing people from finding your actual location.<br>
</p>
<p>Before we begin, please navigate to your Xirvik server page.</p>
At the top of the page you'll find text that reads “<strong>Your server IP address: xx.xx.xx.xx</strong>”. <br>
Copy the numbers, we will need them later. <br>
For an example of what to look for, see the image below.
<p></html> <html></p>
<p>This tutorial covers how to use your Xirvik proxy with several different browsers.<br>
Please follow the directions for all of the browers that you'd like to be protected through your server's proxy.<br>
<em>You may skip to the bottom at any time for instructions on how to test the connection.</em><br>
</p><ul>
<li><strong><a name="toc" id="toc">Table of Contents</a></strong>
  <ul>
    <li><a style="color: rgb(0, 102, 51);" href="#browset"><strong>Setting Up Browsers</strong></a>

        <li><a style="color: rgb(255, 102, 51);" href="#fire"><strong>Mozilla Firefox</strong></a> <em>(Section 1)</em></li>
        <li><a style="color: rgb(0, 102, 255);" href="#ie"><strong>Internet Explorer</strong></a> <em>(Section 2)</em></li>
        <li><a style="color: rgb(153, 0, 51);" href="#gc"><strong>Google Chrome</strong></a> <em>(Section 3)</em></li>
        <li><strong><a style="color: rgb(153, 102, 0);" href="#op">Opera</a></strong> <em>(Section 4)</em></li>

    </li>
    <li><strong><a style="color: rgb(0, 51, 51);" href="#testconn">Testing Your Connection</a></strong><br>
    </li>
  </ul>
</li>
</ul>
<h2><span class=“browsersetup”><a name=“browset” id=“browset”>Setting Up Browsers</a></span><br>
</h2>
<h4 class=“mozz”><a name=“fire” id=“fire”>Mozilla Firefox</a></h4>
<h5>(Section 1) <a href=“#toc”>(Table Of Contents)</a></h5>
<p>We will begin by opening up the Firefox Browser.</p>
<p>Next navigate to Tools > <strong>Options</strong> (Alternately Hold Alt + T then click O)</p>
<p></html>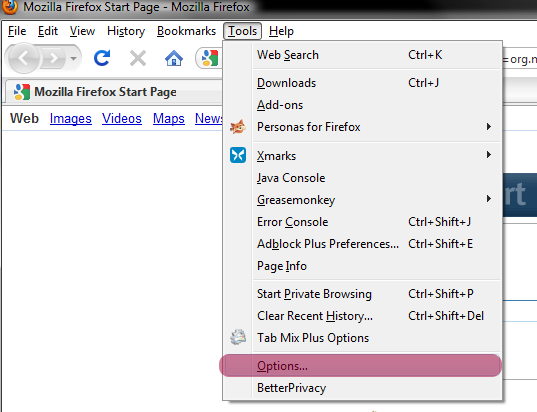 <html></p>
<p>Next switch the main tab to <em>Advanced</em>, and the secondary tab to <em>Network</em>.<br>
Under Connection hit <strong>Settings</strong>.</p>
<p> </html>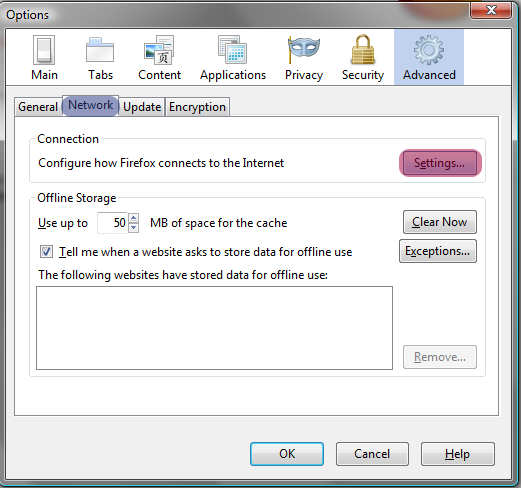 <html></p>
<p>The dialog box seen below will appear.</p>
<p>Check <strong>Manual proxy configuration</strong>,<br>
Enter your <strong>Servers IP address</strong> for HTTP Proxy, and <strong>7128</strong> for the port.</p>
You may choose to select <strong>Use this proxy server for all protocols</strong>. However, it is not necessary.<br>
<p></html>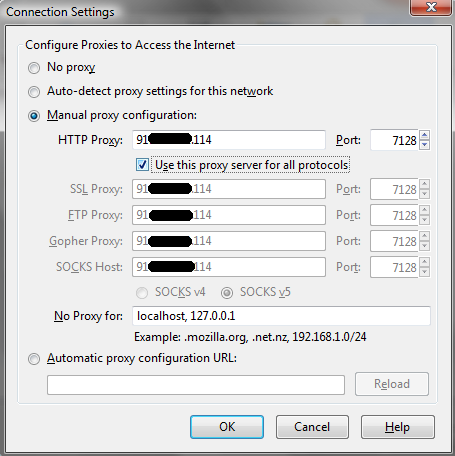 <html></p>
<p>Finally, hit <strong>OK</strong> and you're all done!</p>
<p><br>
</p>
<h4 class=“iexp”><a name=“ie” id=“ie”>Internet Explorer</a></h4>
<h5>(Section 2) <a href=“#toc”>(Table Of Contents)</a></h5>
<p>First open up Internet Explorer.</p>
<p>Next click the <strong>Tools</strong> button on the upper right (highlighted in the image below).</p>
<p></html>
 <html></p>
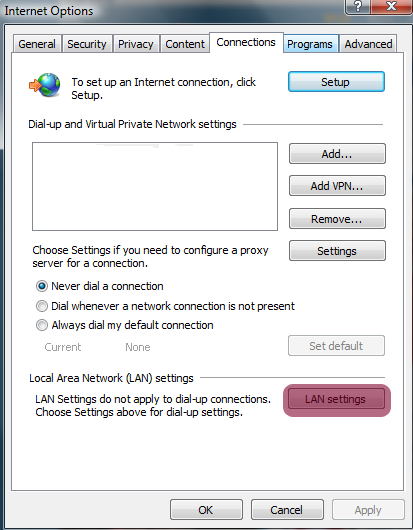
<p>Click internet options and switch the tab to <em>Connections</em>.</p>
<p> </html>
 <html></p>
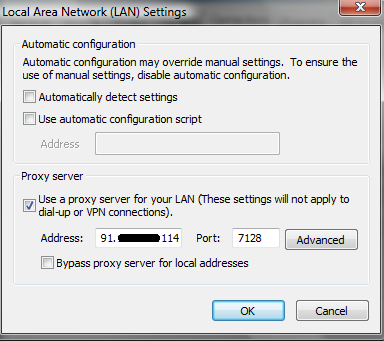
<p>Clicking <strong>LAN settings</strong> will bring up the dialog box below.</p>
<p></html>
 <html></p>
<p>Once here check “<strong>Use a proxy server for your LAN</strong>”.</p>
<p>Then enter your server IP that we gathered at the beginning of this tutorial.<br>
Enter <strong>7128</strong> for the port and hit <strong>OK</strong>.</p>
<p> </p>
<h4 class=“goog”><a name=“gc” id=“gc”>Google Chrome</a></h4>
<h5>(Section 3) <a href=“#toc”>(Table Of Contents)</a></h5>
Open up the Google Chrome Browser, <br>
Navigate to the <strong>Wrench</strong> in the upper right-hand corner, then select <strong>Options</strong>.
<p></html>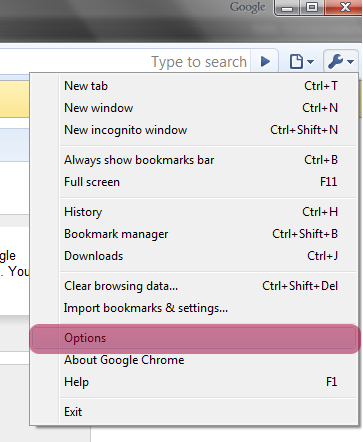 <html></p>
<p>Once in Options, switch to the <em>Under the Hood</em> tab.</p>
<p></html>
 <html></p>
<p>Under “Network” select <strong>Change proxy settings</strong>.<br>
This takes you to the same Internet properties as in Section 2.<br>
Where you can select LAN settings, and check "<strong>Use a proxy server for your LAN</strong>".</p>
<p>Finally enter your Server IP, and<strong> 7128</strong> for the port. Hit <strong>OK</strong> and you're done!</p> <p> </p> <h4><a name=“op” class=“opera” id=“op”>Opera</a></h4> <h5>(Section 4) <a href=“#toc”>(Table Of Contents)</a></h5> <p> Filling out the <strong>Internet Options</strong> in the Control Panel or by following Section 2 or 3 you will apply the proxy to Opera as well.</p> <h2 class=“testconnec”><a name=“testconn” id=“testconn”>Testing the Connection</a></h2> <p>We have setup the proxy server, now it's time to see if everything is working properly.</p> <p>This can be done with any browser!</p> <p>Go to your Address/Navigation tool bar, and type in <strong>www.WhatIsMyIP.com</strong>. Hit <strong>Enter</strong>.</p> <p>The browser should now ask you for authentication of some sort.<br>
Enter in your seedbox username and password and hit <strong>OK</strong>. </p>
<p>This will bring you to a website that tells you your IP address.</p>
<p></html>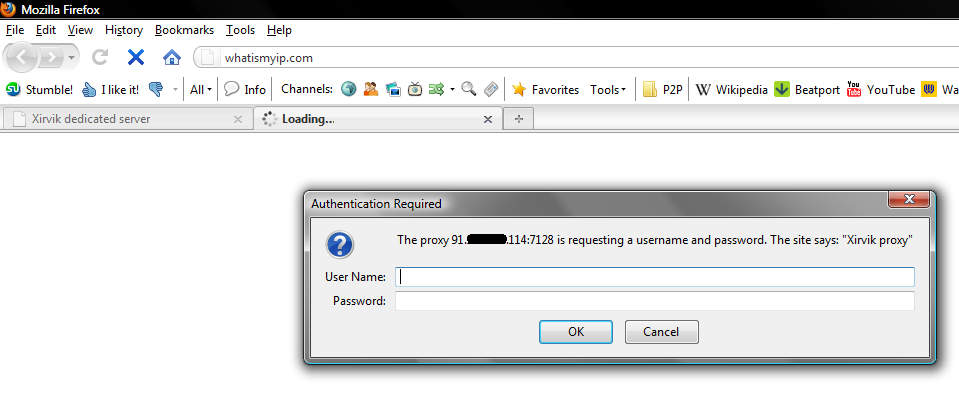 <html></p>
If you did everything correctly you should see the server's IP address that we gathered at the beginning of this tutorial.<br>
<h3>Example: <br>
</h3>
<p></html>
 <html></p>
<p>If you do, then Congratulations! You have successfully configured a proxy on this browser!<br>
Happy, and Safe surfing!</p>
</html>
