This is an old revision of the document!
<html>
<h2><strong><font color=“#000000”>ruTorrent Tutorial</font></strong></h2> <p>While our seedboxes equipped with rTorrent come with 4 unique flavors of rTorrent, our favorite is ruTorrent.</p> <p>Why is ruTorrent our number one choice?</p> <ul>
<li>Fast and lightweight</li>
<li>Plugins (some exclusive to Xirvik)</li>
<li>Full of settings and features</li>
<li>Pretty and easy to use!</li>
</ul>
<p>From the control panel, select BitTorrent clients and then <strong><font color=“#c31f00”>Access ruTorrent</font></strong>.</p>
<p></html>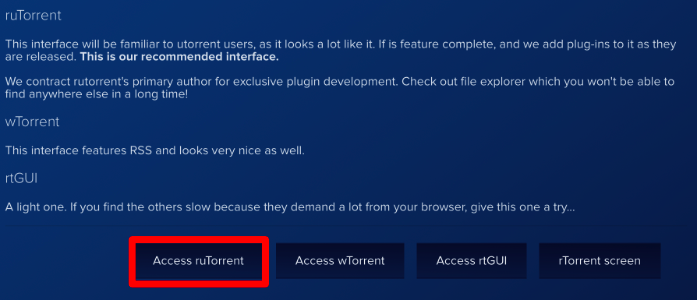 <html></p>
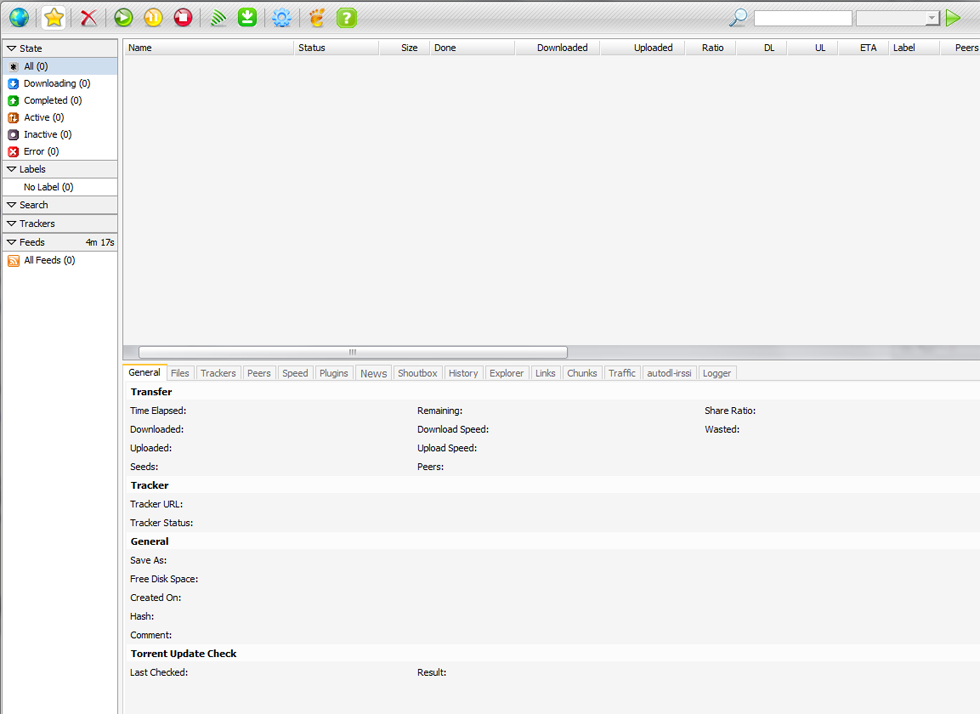
<p>When you first open up ruTorrent, after the brief loading period, you will quickly notice one thing. It has the user-friendly and familiar looks of uTorrent!</p>
<p></html>
  <html></p>
<p>In fact, it's so similar that most of you will be able to pick it up in a matter of seconds.<br>
If not, stick around for further explanation. </p>
<p>Here's a quick overview of the toolbar.</p>
<p></html> <html><br>
<br>
The star allows you to create a new torrent.<br>
The X lets you delete a single, or many selected torrents.<br>
<strong><font color="green">Start</font></strong>, <strong><font color="yellow">Pause</font></strong>, and <strong><font color="red">Stop</font></strong> are quite self-explanatory transfer control functions.<br>
Clicking any of these when a single or many torrents are selected will either Start, Pause, or Stop them.<br>
<br>
The drive with the arrow is for  configuration backup. </p>
<p>The green signal with the R is the rules manager for RSS<br>
The green signal is to Add an RSS feed.<br>
The green download button is for autodl-irssi <br>
<br>
The blue gear is the settings button.<br>
The <strong>?</strong> opens the About box..</p>
<p><br> </p> <h3>Adding a Torrent</h3> <p>This tutorial will first cover the basics (such as adding a torrent), and then more <a href=“#advancedfeatures”>advanced features</a>.<br>
To add a torrent,
select the <strong><font color="#cc3300">Globe button</font></strong> in the top left corner.</p>
<p></html> 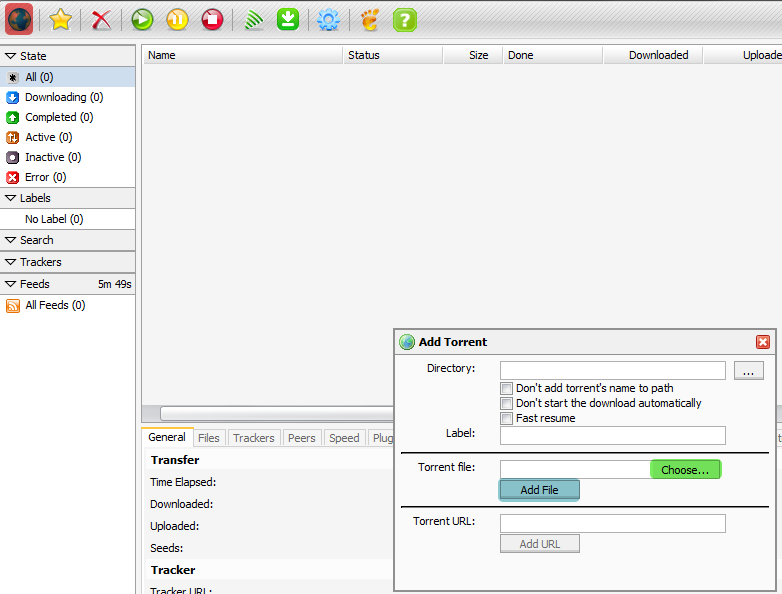 <html></p>
<p>A small dialog box will appear.<br>
Select <strong><font color="#7bb266">Browse</font></strong> and locate the .torrent file we previously downloaded. Then select <strong><font color="#7ae4db">Add File </font></strong>to begin downloading.</p>
<p>In a moment you'll notice a new torrent entry, and your file(s) will start downloading..</p>
<p></html>  <html></p>
<p>Looking towards the bottom of the screen in the <em>General </em>tab you will see some basic information about the torrent.<br>
</html> {{:sd21.png|}}<html></p>
<p>The <em>Files </em>tab will show you all of the files for the respective torrent entry.<br>
Through the right click context menu you can individually choose which files to give priority and which to avoid downloading.<br>
For a more thorough explanation of the file explorer check the tutorial. <br>
<br>
</html> {{:sd22.png|}}<html></p>
<p> </p>
<p> </p>
<p> </p>
<h2><a name=“advancedfeatures” id=“advancedfeatures”>Advanced RuTorrent Features</a> </h2>
<p> </p>
<h3><u>RuTorrent Configuration Backup</u></h3>
<p>To backup/save your user data or torrents click on the button on the top of the rutorrent window as seen below.</p>
<p></html> 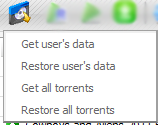 <html></p>
<p>“Get user's data” will download your preferences and settings to your computer. “Get all torrents” will download your list of torrents to your computer.</p>
<p>To restore this data at a later time use “Restore user's data” and “Restore all torrents”. Simply navigate to the saved file and restore.</p>
<p><br>
<br>
</p>
<h3><u>Creating a New Torrent</u></h3>
<p>To create a new torrent first click on the yellow star at the top left of the ruTorrent window.<br>
</p>
<p></html>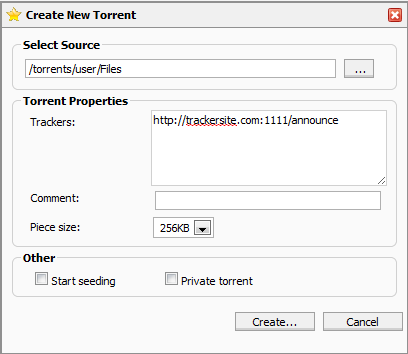 <html></p>
<p>First select your source from the files on your seedbox. You may need to upload the files to your seedbox first using FTP.</p>
<p>Enter 1 or more tracker announce URLs (you may only use 1 if it's a private tracker!). <br>
The URL can be found on the upload page of the tracker you wish to upload to. (e.g. http://trackersite.com:1111/announce)</p>
<p>If you will be uploading the torrent to a private tracker check “Private torrent”. <br>
If you want to start seeding the torrent immediately after creating it check "Start seeding".</p>
<p>Finally click <strong>Create</strong> to make the torrent. After it finishes the <strong>Save</strong> button will save it to your hard drive.<br> </p> <p> </p> <p><br> </p> <h3><u>File Explorer and Screenshot Plugin</u></h3> <p>This is a basic tutorial on the file explorer plugin. For a more thorough explanation check the File Explorer tutorial.</p> <p>To access the File Explorer click the <em>Explorer</em> tab on the bottom pane of the ruTorrent window.</p> <p>The power of the file explorer plugin lies in the right-click context menu. <br>
Right clicking on a file or folder gives access to actions including: Delete, Move/Rename, Copy, Upload, Create, or Extract (only on archives).</p>
<p></html>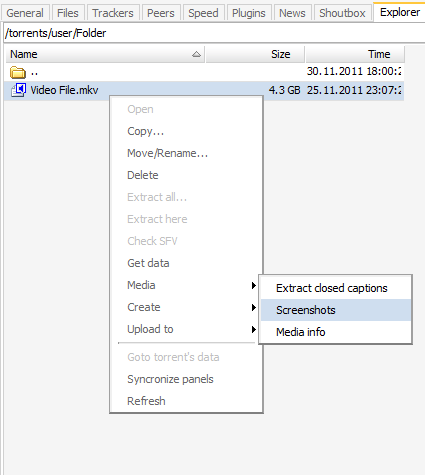 <html></p>
<p>Right clicking a media file gives you more options found in the Media section within the context menu. <br>
On video files you can extract captions/subtitles, or get a glimpse of the video by selecting <strong>Screenshots </strong>(takes screenshots of frames).</p>
<p></html>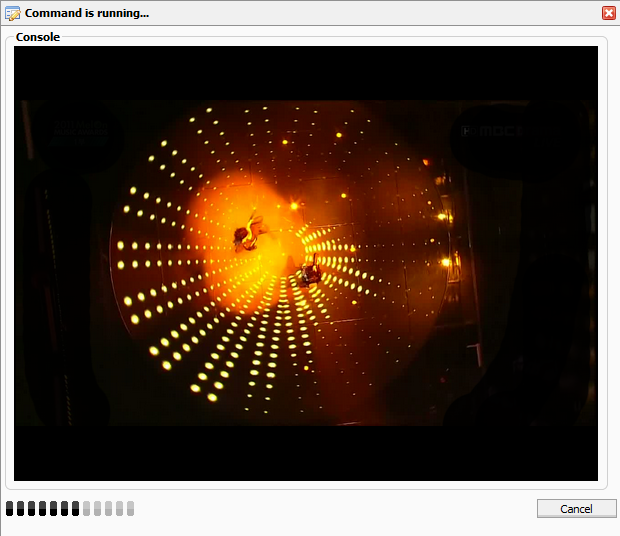 <html></p>
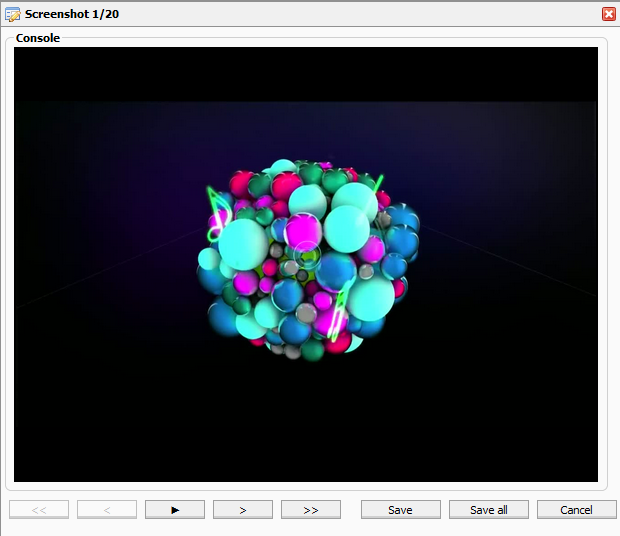
<p>After the screenshots are all taken you can click the play button for a slideshow or save the pictures.</p>
<p></html>
  <html></p>
<p>For instruction on how to change the settings of the Screenshots plugin click <a href=“#screenshotsettings”>here</a>.</p>
<p><br>
<br>
</p> <p> </p> <h3><u>Automatic Downloading using IRSSI</u></h3> <p>To set up automatic downloading via IRSSI first click on the green download sign up top.<br>
We will start by setting up the filter to tell the autodownloader what files to download and what files to avoid. <br>
</p> <h3><em><font color=“orange”>Filters<br>
</font></em></html> {{:rutorirssi.png|}}<html></h3>
<p>Select <strong><font color=“orange”>Filters</font></strong>.</p> <p>In this section you can add and edit your filters. The general filter menu is seen below.<br>
The first step is to click <strong>Match sites</strong> and pick a server (which we will set up later).</p>
<h4><a name=“General” id=“General”></a>General</h4>
<p></html>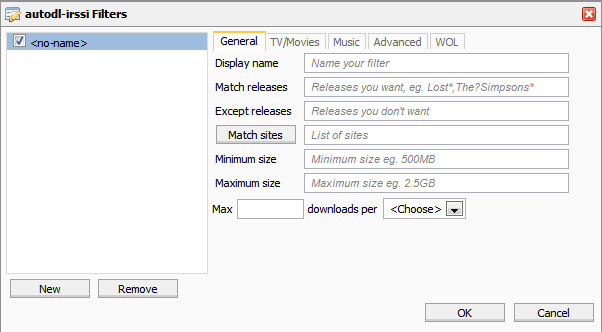 <html></p>
<ul>
<li><strong>New</strong> - <em>Add a new filter</em></li> <li><strong>Remove</strong> - <em>Remove an existing filter</em></li> <li><strong>Display name</strong> - <em>Name of the filter (e.g. name of TV show)</em></li> <li><strong>Match Release</strong> - <em>Releases you want to match</em></li> <li><strong>Except releases</strong> - <em>Releases you do not want to match</em></li> <li><strong>Match Sites</strong> - <em>list of sites you wish to match against</em></li> <li><strong>Minimum size</strong>- <em>minimum size</em></li> <li><strong>Maximum size</strong> - <em>maximum size</em></li> <li><strong>Max downloads per</strong> -<em> how many times per week/month/year to download a matching file (to avoid duplicates)</em></li>
</ul>
<h4><a name=“TV/Movies” id=“TV/Movies”></a>TV/Movies</h4>
<p></html>  <html></p>
<ul>
<li><strong>TV Show/Movie</strong> - <em>Name of TV Show</em></li> <li><strong>Seasons</strong> - <em>Seasons you wish to match, i.e 1,4,7 or 1-5</em></li> <li><strong>Episodes</strong> - <em>Episodes you wish to match i.e. 2,4,13 2-9</em></li> <li><strong>Resolutions -</strong> <em>Resolutions you wish to match i.e 720p, 1080p</em></li> <li><strong>Encodes</strong> - <em>Encodes you wish to match i.e DivX, h.264, x264</em></li> <li><strong>Sources</strong> - <em>Sources you wish to match i.e. HDTV, Web-DL</em></li> <li><strong>Years</strong> - <em>Years i.e. 2008, 1975, 1982</em></li>
</ul>
<h4><a name=“Music” id=“Music”></a>Music</h4>
<p></html> 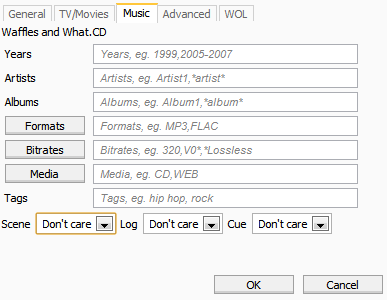 <html></p>
<ul>
<li><strong>Years</strong> - <em>Years, i.e. 1997, 1959, 2010</em></li> <li><strong>Artists</strong> - <em>Artist or Artists you wish to match</em></li> <li><strong>Albums</strong> - <em>Album or Albums you wish to match</em></li> <li><strong>Formats</strong> - <em>Formats, i.e. MP3, FLAC</em></li> <li><strong>Bitrates</strong> - <em>Bitrate you wish to match i.e. 320, Lossless</em></li> <li><strong>Media</strong> - <em>Source Media i.e. CD, WEB</em></li> <li><strong>Tags</strong> - <em>Tags you wish to match i.e. hip hop, rock, electronic</em></li> <li><strong>Scene</strong> - <em>Whether or not it's scene </em></li> <li><strong>Log</strong> - <em>Log file, yes or no or don't care</em></li> <li><strong>Cue</strong> - <em>Cue file, yes or no or don't care</em></li>
</ul>
<h4><a name=“Advanced” id=“Advanced”></a>Advanced</h4>
<p></html> 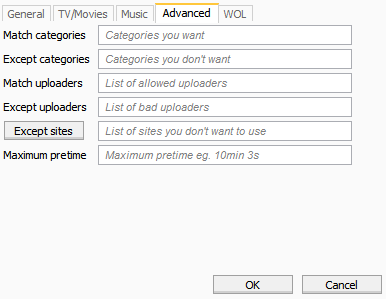 <html></p>
<ul>
<li><strong>Match Categories</strong> - <em>Categories you want</em></li> <li><strong>Except Categories</strong> - <em>Categories you do not want</em></li> <li><strong>Match Uploaders</strong> - <em>Uploaders you wish to match</em></li> <li><strong>Except Uploaders</strong> - <em>Uploaders you do not wish to match</em></li> <li><strong>Except Sites</strong> - <em>Sites you do not wish to match for this filter</em></li> <li><strong>Maximum pretime</strong> - <em>maximum pretime, i.e, 10min, 3s</em></li>
</ul> <h4><br>
<br>
</h4> <p>After setting up your filter we must set up the tracker settings for connectivity.</p> <h3><em><font color=“#c73200”>Trackers</font><br>
</em></html>{{:rutorirssi.png|}} <html></h3>
<p>Select <strong><font color=“#c73200”>Trackers</font></strong>.</p>
<p></html>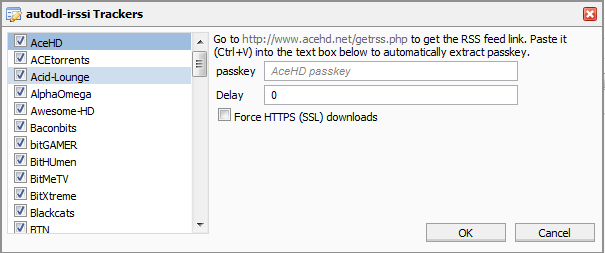 <html></p>
<p>Copy your pass/auth key from the tracker you wish to set up. <br>
For each tracker you select on the left, there will be an information section on the right telling you how to get the key (see above). </p>
<p>Paste it in the passkey field and hit <strong>OK</strong> to save it.<br> </p> <p><br>
<br>
</p> <h3><font color=“green”><em>Announce Channels</em></font> <br>
</html> {{:rutorirssi.png|}}<html></h3>
<p>Now we need to click the IRSSI button again and select <strong><font color=“green”> Announce Channels</font> </strong>to get the IRC information for the tracker we're setting up.</p>
<p></html>  <html></p>
<p>Scroll through the left and find the tracker you're setting up and copy down the information to the right (Network, Server, Channel, Announcer).</p>
<p> </p>
<h3><font color=“blue”><em>IRC Servers</em></font><br>
</html>{{:rutorirssi.png|}} <html></h3>
<p>Now click on <strong><font color=“blue”>IRC Servers</font></strong> from the IRSSI button.</p> <p>In the left area you can view IRC servers that are already configured, add new servers or remove servers. <br>
You can also disable servers by using the check boxes to the left of each entry.</p>
<p></html> 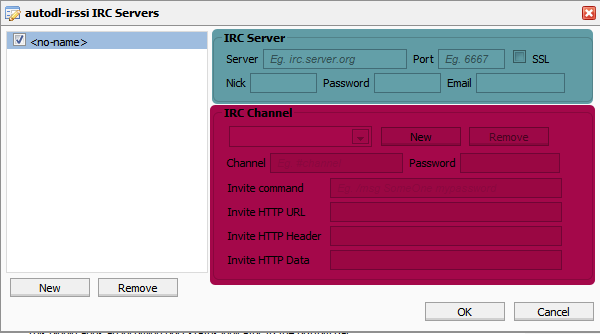 <html></p>
<font style=“background-color: rgb(22, 112, 125);” color=“white”>
<br>In the <em>IRC Server</em> section:
</font>
<ul>
<li><font style="background-color: rgb(22, 112, 125);" color="white"><strong>Server</strong> - <em>This is where you put the server address, i.e irc.server.com</em></font></li> <li><font style="background-color: rgb(22, 112, 125);" color="white"><strong>Port</strong> -<em> This is where you specify the port (leaving this blank uses 6667)</em></font></li> <li><font style="background-color: rgb(22, 112, 125);" color="white"><strong>SSL</strong> - <em>Check this box if you are connecting to an SSL server port</em></font></li> <li><font style="background-color: rgb(22, 112, 125);" color="white"><strong>Nick</strong> - <em>This is the IRC username for this server</em></font></li> <li><font style="background-color: rgb(22, 112, 125);" color="white"><strong>Password</strong> - <em>This is the nickserv password</em></font></li> <li><font style="background-color: rgb(22, 112, 125);" color="white"><strong>Email</strong> - <em>This is the email address your user is registered under</em></font></li>
</ul> <font style=“background-color: rgb(22, 112, 125);” color=“white”> <br><strong>Note:</strong> - If you haven't registered your nick, autodl-irssi will attempt to register it using the settings here </font> <p><font style=“background-color: rgb(167, 8, 75);” color=“white”>In the <em>IRC Channel</em> section you can set up the channels you wish autodl-irssi to join and monitor:</font></p> <font style=“background-color: rgb(167, 8, 75);” color=“white”> <ul>
<li><strong>Channel Select</strong> - <em>Marked with #1 in the picture above, this allows you to select channels which are already configured in order to edit settings.</em></li> <li><strong>New</strong> - <em>Creates a new channel entry</em></li> <li><strong>Remove</strong> - <em>Removes the currently selected channel</em></li> <li><strong>Channel</strong> - <em>Channel name, i.e #torrent-announce</em></li> <li><strong>Password</strong> - <em>If the irc channel requires a password to join, it goes here</em></li> <li><strong>Invite Command</strong> - <em>If you must enter a specific command to join a channel, it goes here, i.e "/msg SOMEONE something password"</em></li> <li><strong>Invite HTTP URL</strong> - <em>if your channel requires a websites url, it goes here</em></li> <li><strong>Invite HTTP Header</strong> - <em>website header</em></li> <li><strong>Invite HTTP Data</strong> - <em>Invite website data</em></li>
</ul> </font> <p>When you are finished inputting the information select <strong>OK</strong>.</p> <p>We're done with the setup phase. Wait and see if the files in your filter are automatically downloaded.<br>
For troubleshooting, check with the tracker! </p>
<p> </p> <p> </p> <h3><u>Downloading using an RSS Feed (Slower than IRSSI)</u></h3> <p>RSS feeds are a slower way of automatically downloading, but have 2 benefits.<br>
First, you can see all the torrents in the feed within rutorrent.<br>
Second, it is easier to set up and compatible with more trackers. </p>
<h3><em><br>
Adding a feed</em></h3>
To add a feed, right click the RSS icon </html> <html> on the top panel.
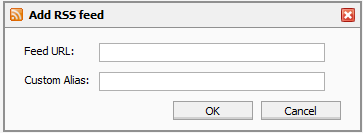
<p>This should bring up a new window, as shown in the next image:</p>
<p></html>
 <html></p>
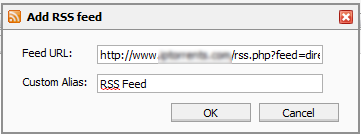
You need to add your RSS feed where it says “Feed URL” and give it a name where it says “Custom Alias”. <br>
<h5>(<em>note: It's important that you always use a download feed rather than a web feed. Also, some feeds require you to enter <a href=“#setcookies”>cookies</a>.</em>)</h5>
<p></html>
  <html></p>
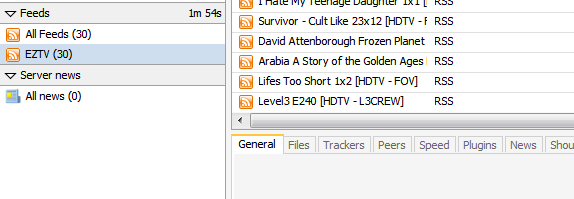
<p>If you added the feed correctly, you should end up with something like this:</p>
<p></html>
  <html></p>
<p>You have everything set up for manually downloading torrents via rss feed. <br>
To manually download items from this feed, right click on the item and select <strong><font color="red">Load</font></strong>.</p>
<p></html> 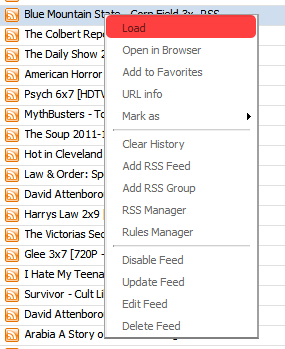 <html></p>
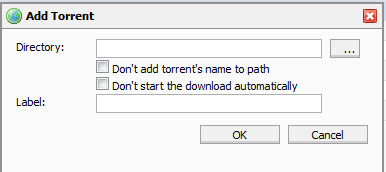
<p>This should bring up an “Add Torrent” window.</p>
<p></html>
 <html></p>
<p>Click <strong>OK</strong> and it will automatically add and begin to download.<br>
<br>
</p>
<h3><a name=“Automatic_Downloading_via_RSS_Manager” id=“Automatic_Downloading_via_RSS_Manager”></a>Automatic Downloading via RSS Manager</h3>
<p>Now lets create filters to automatically download the files we want.</p>
<p>Right click the feed you want to manage and select RSS Manager.</p>
<p></html> 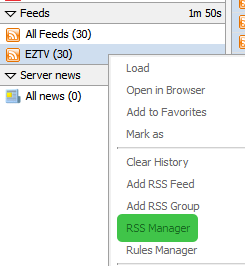 <html></p>
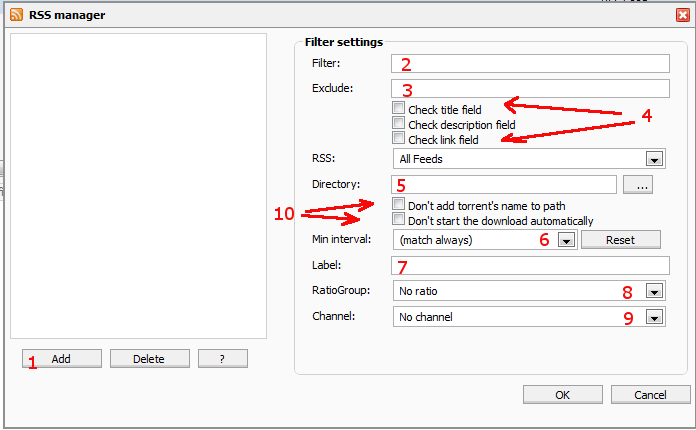
<p>The filter manager has many options, here's an overview of what they do.</p>
<p></html>
 <html></p>
<ol>
<li>Add: This adds a new filter rule.</li>
<li>Filter: This is where you put the filter regex.</li>
<li>Exclude: This is where you put the exclude regex.</li>
<li>Check Fields: This is where you decide what the filter should match against</li>
<ul>
  <li>Title Field: This is the title of the RSS entry.</li>
  <li>Description field: This is the description data for the rss item.</li>
  <li>Link Field: This is the http link for the rss item.</li>
</ul>
<blockquote>
  <h5> <em>The default is to use only the "Title Field", if you use the others, make sure you know what you are doing, or it could lead to unwanted matches</em></h5>
</blockquote>
<li>Directory: This is the save path for the torrent data.</li>
<li>Match Interval: This is the rate at which the filter will download new torrents (the default is always).</li>
<li>Label: This is the label for rutorrent, used mainly to sort the list of seeding torrents (note: if you use auto-tools, and leave this blank, it will automatically label the torrent based on normal auto-tools rules).</li>
<li>Ratio Group: This is the ratio group you want the matched torrents to be in.</li>
<li>Channel: This is the download/upload channel you want the matched torrents in.</li>
<li>Download options: These define behavior for matched torrents, don't add the torrent's name to path or don't start download automatically (torrent added to list in "stopped" format).</li>
</ol> <p>So to add a filter, just click the <strong>Add</strong> button (1). This will create an empty filter rule, give it a name, and enter your regex filter in the Filter section (2). (For more info on regex, see <a href=“http://www.regular-expressions.info/” rel=“nofollow”>http://www.regular-expressions.info</a>. Also, regex filters in rutorrent need to be enclosed in / /i tags, you could use other tags, but this is the standard, case insensitive tag). An example of a filter might be:</p> <pre>/Lost.S06E.*/i</pre> <p>If you wish to exclude items from your filter, you could code this into the standard filter, but it's much more simple to use the “EXCLUDE” option (3). The syntax for this field is the same as the “Filter” field, a standard exclude might look like this:</p> <pre>/(DVDR|Complete|DVDRip|BDrip|Bluray)/i</pre> <p>For (4) the default is often the desired case, the other 2 options are used much less often. The description field is the RSS description, or category. The link field is the actual HTTP link. Using these check boxes allows you to match text in these areas.</p> <p>For (5) you set the download path. Comes in handy when using plugin <a href=“http://code.google.com/p/rutorrent/wiki/PluginAutotools”>AutoTools</a>.</p> <h3><br>
Example</h3>
<p>Here is what an RSS filter might look like:</p>
<p></html>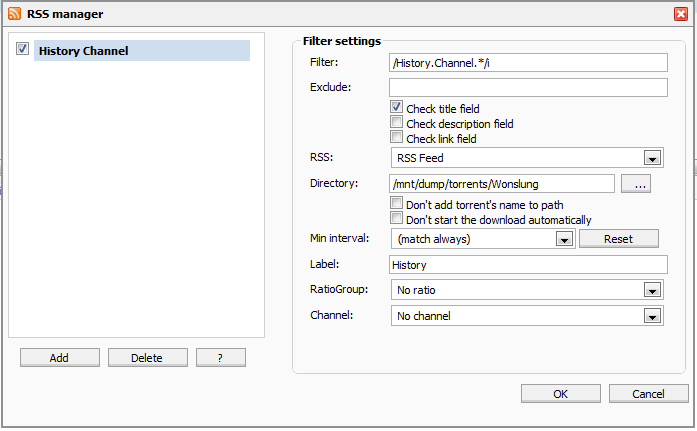 <html></p>
<p>You can add as many filters as you like. To disable a filter, you can click the check box next to the filter's name.<br>
<br>
</p>
<h3><a name=“Renaming_a_Feed” id=“Renaming_a_Feed”></a>Renaming a Feed</h3>
<p>To rename a feed, right click on the feed and select <strong><font color=“blue”>Edit feed</font></strong>.</p>
<p></html> 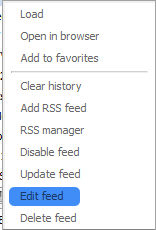 <html></p>
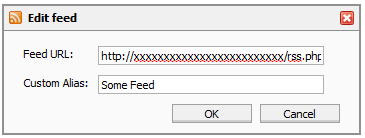
<p>This should open a window with the feed name and path, allowing you to rename the feed.</p>
<p></html>
 <html></p>
<h3><a name=“Using_feeds_that_require_HTTP_authentication” id=“Using_feeds_that_require_HTTP_authentication”></a>Using feeds that require HTTP authentication</h3>
<p>For feeds that require HTTP authentication, simply use this format for the feed URL:</p>
<pre>http://username:password@sometorrentsite.com/rss.php</pre>
<h3><a name=“setcookies” id=“Using_feeds_that_require_cookies”></a>Using feeds that require cookies</h3>
<p>To use feeds that require cookies, you must find the cookie for the site, and grab the UID and pass from it.</p>
<ul>
<li>IE users will find their cookies in %UserProfile%\Cookies.</li> <li>Firefox users will find their cookies in Tools > Options > Privacy > Show Cookies</li> <li>Opera users will find their cookies in Tools > Advanced > Cookies</li> <li>Chrome users will find their cookes in Options > Under the Hood > Content settings > All cookies and site data</li> <li>Users of other browsers will have to consult their browser's documentation.</li>
</ul>
Once you have the necessary information, use this format for the feed URL:
<pre>http://tracker.com/rss.php:COOKIE:name1=value;name2=value;</pre>
<p>Another way to inform ruTorrent about required cookies is to input them in the <em>Cookies</em> section of the settings. Check <a href=“http://code.google.com/p/rutorrent/wiki/PluginCookies”>here</a>.</p>
<p> </p>
<p><br>
</p>
<p> </p>
<h3>RuTorrent Settings</h3>
<p>Let's check out the settings now. Hitting the gear button </html> <html>will open the rTorrent settings window. </p>
<p>The settings are for advanced users, most new users will never need to change these.<br>
It can do more harm than good to change these settings without knowing what they do.</p>
<font style=“background-color: black;” color=“white”> </html>  <html><br>
<br>
The <em>General</em> section has a couple of things that may be relevant to the average seedbox user. <br>
<br>
You may wish to change the GUI update time.<br>
This means the information about the active torrents will refresh quicker.
Too low may cause slowdowns though.<br>
<br>
Request Timeout may be useful if you run into frequent timeout errors. <br>
You may try to resolve them by halving or doubling this number. <br>
<br>
A newer feature is the option to theme ruTorrent, to give it a different look.
<br>Foreign users may wish to change the language of text to their native language.
</font><br>
<p></p>
<p></html>
  <html>
<font style=“background-color: red;”>
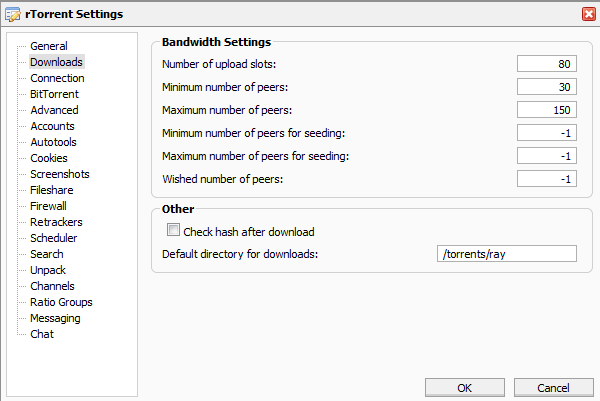
</font></p><p><font style=“background-color: red;”>The <em>Downloads</em> section might be useful if you wish to change bandwidth settings but is totally unnecessary.</font></p><font style=“background-color: red;”>
<p>Checkmarking “Check hash after download” will verify that downloaded files are complete and not corrupted after each download.<br>
</p>
</font>
<p> </p>
<p></html>
 <html></p>
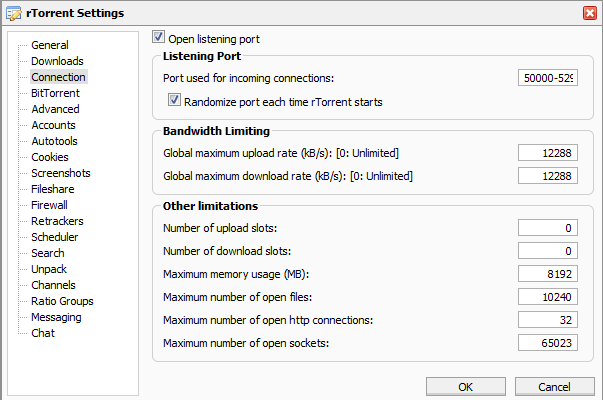
<p><font style=“background-color: green;” color=“black”>The <em>Connection</em> section should not be touched, as it is set at the optimal configuration for your seedbox. <br>
If you wish, you may choose a specific port for rTorrent to use by unchecking "Randomize port each time rTorrent starts" and entering a port number.</font></p>
<p> </p>
<p></html> 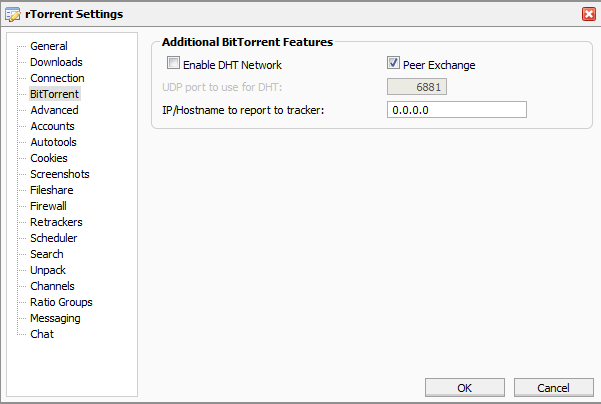 <html></p>
<p><font style=“background-color: orange;” color=“black”>The <em>BitTorrent</em> section might be useful for specific private trackers that do not allow DHT network or Peer Exchange features to be enabled.<br>
You may also wish to report a different IP Address to trackers, although this is generally not recommended.<br>
<br>
</font></p>
<p>The <em>Advanced</em> section should not be touched! Only for users who already know what they're doing.<br>
<br>
</p>
<p></html> 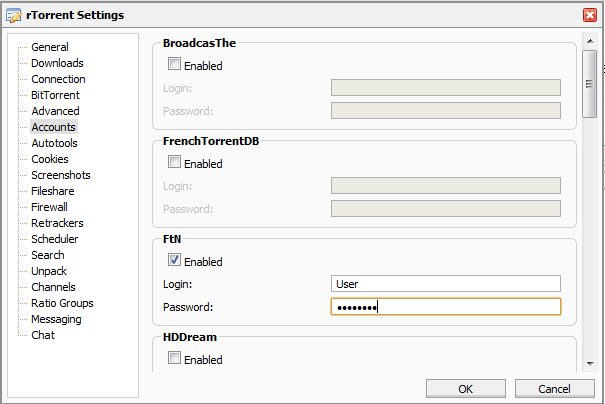 <html></p>
<p><font style=“background-color: brown;” color=“white”>Enter your account information in the <em>Accounts</em> section if you wish to search private trackers directly from ruTorrent.</font></p>
<p> </p>
<p></html>
 <html></p>
<font style=“background-color: pink;” color=“black”>
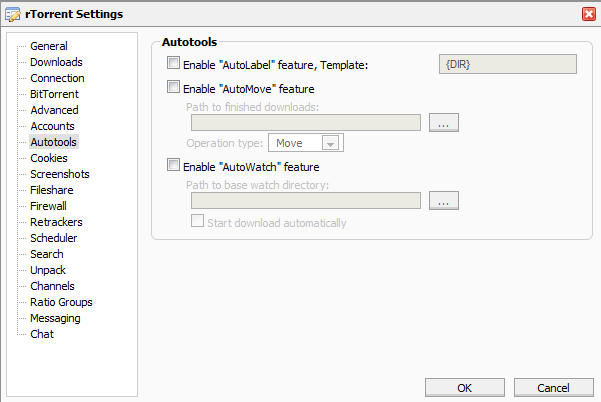
<p>The <em>Autotools</em> section isn't useful to most users. Here you can set up rTorrent to automatically label torrents, move files, and watch for new torrents.</p>
<p>For more in-depth information check the <a href=“http://code.google.com/p/rutorrent/wiki/PluginAutotools”>project website</a>.</p>
</font>
<p>The <em>Cookies</em> section allows you to input cookie information for trackers that require such information to work.<br>
Check <a href="http://code.google.com/p/rutorrent/wiki/PluginCookies">here</a> for details on how to get the information. </p>
<p> </p>
<p></html> 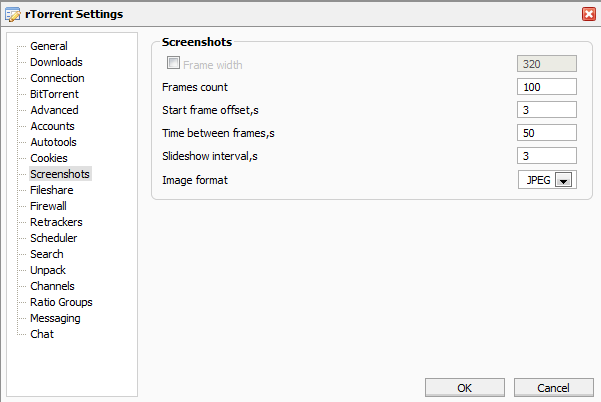 <html></p>
<p><font style=“background-color: yellow;” color=“black”>The <em>Screenshots</em> section of the settings allows you to set up preferences for the screenshot plugin.<br>
<br>
Optimal settings depend on the video which the screenshots are being taken from.<br>
A short video would need less "Time between frames" while a long one might need more.<br>
The "Frames count" indicates how many screenshots are taken overall.</font></p>
<p> </p>
<p></html>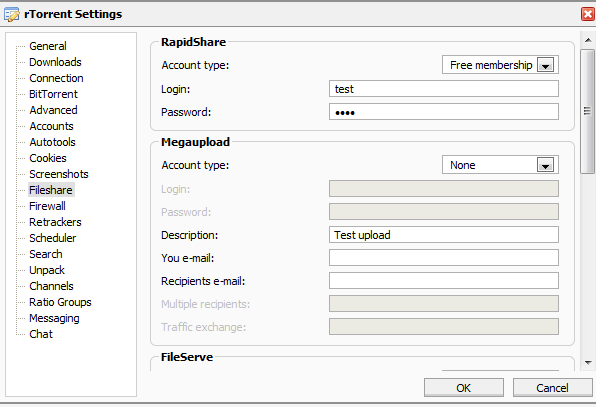 <html></p>
<font style=“background-color: blue;” color=“white”>
<br>In the <em>Fileshare </em>section you can set up your account details for various filesharing websites.<br>
You can then upload to the websites using the file explorer in ruTorrent.
</font> <p><br>
Adding an IP address to the field in the <em>Firewall</em> section will block that IP address from being a peer.<br>
A good place to get lists of IP addresses to block is <a href="http://www.iblocklist.com/lists.php">http://www.iblocklist.com/lists.php</a>.</p>
<p> </p>
<p></html> 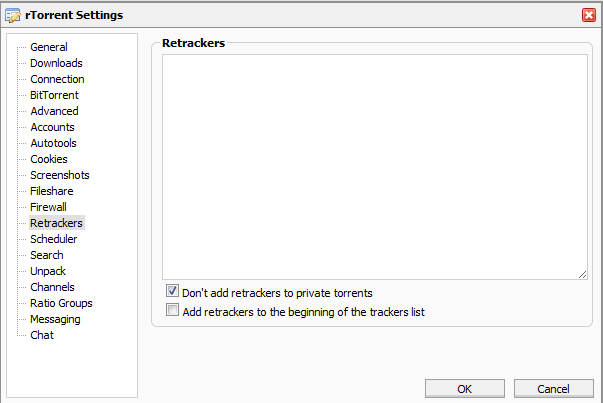 <html></p>
<font style=“background-color: purple;” color=“white”>
<br>Adding tracker announce URLs to the field in <em>Retrackers</em> section will append the URLs to new torrents as soon as they are added.<br>
It is highly not recommended to use this with private trackers, it will likely get you banned.<br>
If you solely use private trackers, do not use this feature.
</font> <p><br>
The scheduler has no practical use on a seedbox. It allows you to schedule what days to seed and/or limit upload and download speeds on certain days.</p>
<p> </p>
<p></html>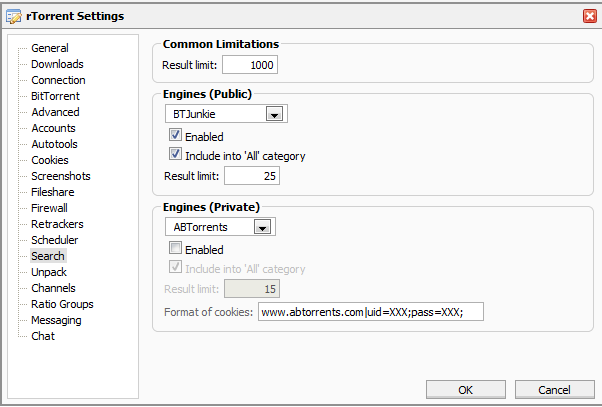 <html></p>
<p><font style=“background-color: gray;” color=“white”>The <em>Search</em> section is where you set up which public and/or private tracker search engines to use. Refer back to the <em>Accounts</em> section to set up your username and password for access to the private engines.<br>
<br>
Use the drop-down menu's to select the engines you wish to use then checkmark Enabled (or uncheckmark to disable).<br>
<a href="#searchfeature">How to use</a></font></p>
<p> </p>
<p></html>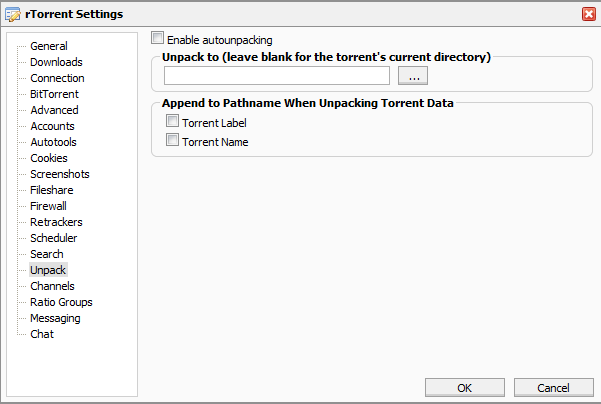 <html><br>
</p>
<p><font style=“background-color: navy;” color=“white”>To enable automatic unpacking/unraring go to the <em>Unpack</em> section and checkmark next to “Enable autounpacking”.<br>
If you want all of your unpacked files to be moved to the same directory you can specify the directory in the field.<br>
<br>
You may add the torrent label or name  to the directory name for better organization. </font></p>
<p> </p>
<p></html> 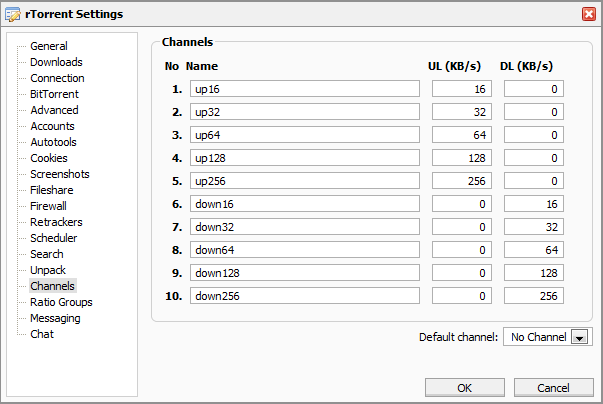 <html></p>
<p><font style=“background-color: lime;” color=“black”>The <em>Channels</em> section allows you to set the upload and download speed for certain channels which can be set by right clicking a torrent entry.<br>
This is not practical on a seedbox but you may find some use for the feature.</font></p>
<p> </p>
<p></html> 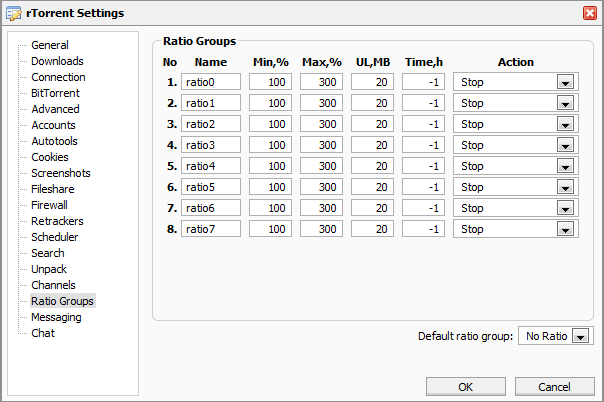 <html></p>
<font style=“background-color: rgb(255, 102, 102);” color=“black”>
<p>The <em>Ratio Groups</em> section allows you to define the ratio limits for 8 ratio groups. </p>
<ul>
<li>Min (%) - Minimum ratio required to perform the defined Action.</li>
<li>Max (%) - Maximum ratio required to perform the defined Action. (Optional)</li>
<li>UL, MB - Minimum amount of data to be uploaded before performing the defined Action.</li>
<li>Action - What will happen when a condition is satisfied. (e.g. Stop the torrent, Remove it or Stop the torrent and clear the ratio group)</li>
</ul>
<p>To add a torrent entry to a ratio group, right click it and choose the ratio group from the context menu.</p>
</font>
<p> </p>
<p></html>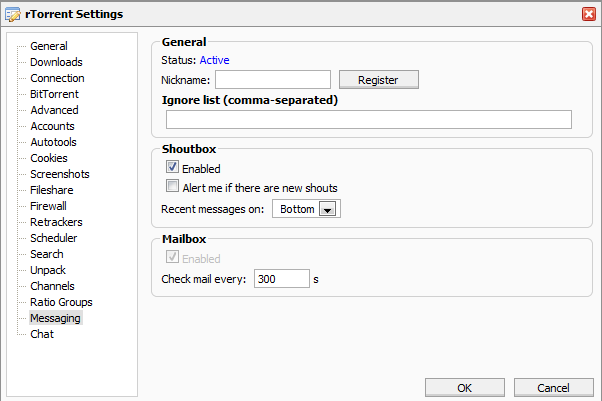 <html></p>
<font style=“background-color: rgb(51, 0, 0);” color=“white”>
The <em>Messaging</em> section is where you can set up your nickname for the shoutbox and can make a list of users to ignore.<br>
Enable or disable the Mailbox from here too.<br>
</font> <p>Change settings for the chat feature in the <em>Chat </em>section. <br> </p> <p> </p> <p>End of the tutorial, send support an email if you require troubleshooting.</p>
</html>
